| This article is only an intoduction. If you would like more information please check out “Manufacture and Repair of Tabla” |
Note: This article originally appeared in Percussive Notes, October 1993, Vol. 31, No 7, page 29-36
Reprinted by permission of the Percussive Arts Society, Inc., 701 N.W., Ferris, Lawton, OK 73507
Introduction
Tabla has been rising in popularity for many years. Concurrent with the increase in popularity is an increase in the need for experienced maintenance personnel. Unfortunately there is a shortage of repairmen qualified to fix tabla. This article will address the concerns of tabla repair and maintenance from a Western standpoint.
Economic and social conditions in India are very different from those in the United States. As far as maintenance of tabla is concerned the most significant differences deal with the relationship between cost of materials and the cost of labor. In India, the cost of materials is quite high while the cost of labor is relatively low. Therefore, traditional techniques are labor intensive but result in an efficient use of materials. Conversely, conditions in the United States are characterized by a very high cost of labor and a relatively low cost for materials.
This article will deal with techniques which have been worked out in the United States. We will not discuss labor intensive, and thus cost prohibitive techniques. All the techniques have been worked out to provide maximum benefit with minimum input of labor.
Parts Of Tabla
We must first familiarize ourselves with the parts of the tabla. I should point out that India is a vast country with many different languages and countless dialects. The nomenclature varies considerably from one part of the country to another (Courtney 1980). The terms in this article generally reflect a dialect of Urdu known as “Deccani” which is sometimes called “Hyderabadi” (Courtney 1985).
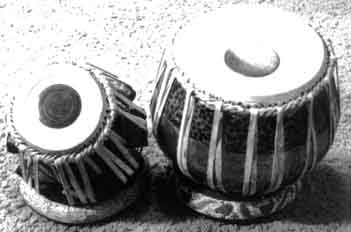
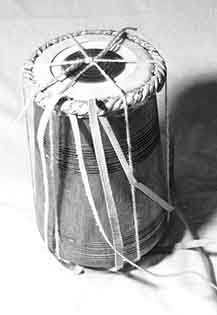
Danya – This is the drum of the right hand (figure 1). It is the finely tuned drum composed primarily of wood.
Banya – This is the metal drum of the left hand (figure 1). It is made of metal and has a deep bass sound.
Lakadi – This is the wooden shell upon which the right hand drum (danya) is made (figure 2). Good woods are teak and “shisham” (rosewood). “Bija” is another wood that is found in the North and is quite good. In the Deep South, one tends to find jackwood. Although jackwood is a fine wood, south Indian tablas tend to be of poor quality for other reasons. Woods to be avoided are mango and “deel”.
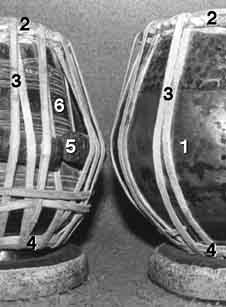
Pital – This is the brass shell upon which the left hand drum (banya) is made (figure 2). Although brass is the most common metal one sometimes finds iron, copper, and aluminum. It is best to get the heaviest shell possible. Aluminum shells tend to have a poor sound because of the low weight. Iron shells give an acceptable sound but rust easily. A heavy copper or brass is preferred.
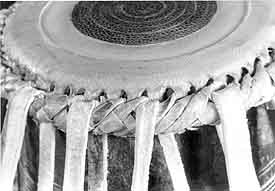
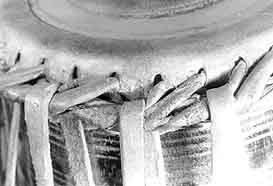
Tasma – This is the rawhide lacing (figure 2). The finest lacing is made of buffalo hide although one often finds cowhide, leather, or even goat skin. One should definitely avoid leather or thin rawhides. These do not have a good strength and will give problems.
Kundal – This is the counter-ring used for lacing the tabla (figure 2). These are commonly made of metal wire or rawhide.
Gatta – These are the wooden dowels used to control the tension (figure 2).
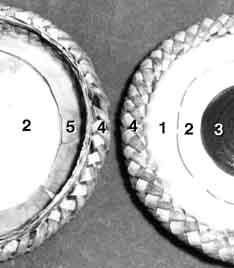
Puddi – This is the drumhead and is the most critical, complex component of the tabla. Figure 3, show the various parts of the puddi. These are; the gajara (braid), the chat (outer annular membrane); the bharti (inner annular lining), the maidan (main resonating membrane), and syahi (black spot). An in depth discussion of the puddi and its manufacture is found elsewhere (Courtney 1988) and is beyond the scope of this work.
Now that we have a good idea of the structure of tabla we may turn our attention to the topic of tuning.
| ARE YOU INTERESTED IN HOW THE TABLA IS MADE? |
|---|
This is the third volume of the most complete series on the tabla. Manufacture and Repair of Tabla |
Tuning
This is the most basic form of maintenance for a tabla. It is so basic that the presumption is that the musician will handle all of the tuning. This process of tuning requires a considerable amount of skill to relate the sound of the drum to the tension of the head (Courtney 1991).
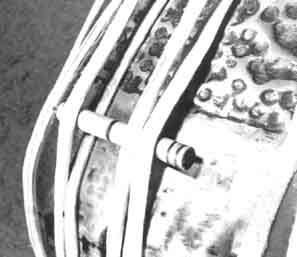
Tuning the banya is simple. If the banya is loose then insert a few gatta between the shell and the tasma (figure 4). If the gatta are already in place, then simply move them up or down to adjust the tension. If this still does not take care of the tension then bring more tasma over the gatta. If all four tasma are over the gatta and it still is not tight, then follow the directions for tightening the drum. This will be discussed later in the article.
The danya (wooden drum) has the most stringent requirements for pitch. One uses the “Na” or the “Tin” stroke to determine the pitch. If one does not know how to play these stroke one may find the information elsewhere (Sharma 1973). These have the advantage of showing what the tension is under a very small area of the rim.
Tuning is performed on the gajara (braid). Striking down with the hammer tightens it and striking from the underside loosens it. If the gajara does not respond to the hammer then the gatta (wooden dowels) must be struck. Hammer the wooden dowels down to increase the tension and hammer them up to loosen. Once the gatta have been moved, return to the gajara for further tuning.
It is very important that one strikes only the gajara with the hammer. An accidental strike against the chat will irreparably damage the tabla!
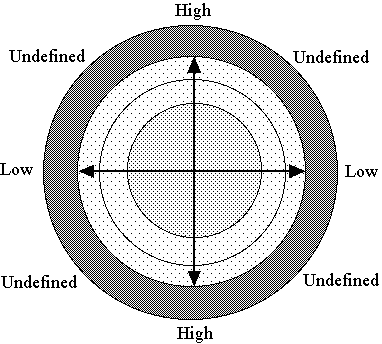
The tension around the drum must be uniform. A drum that is out-of-tune has a cross pattern of pitches as shown in figure 5. We see that there are two areas of relatively high pitch and two areas of relatively low pitch. Between them are zones where the pitch is poorly defined. If one is having a hard time hearing the pitch, it may be because one is striking an area of undefined pitch. Shift a little around the rim and the pitch is often easier to hear.
There are many cases where the heads simply do not respond to the striking of the hammer. This may be caused by several reasons but the most common condition is improper tension on the straps. In such cases the drum needs to be retightened.
Tightening
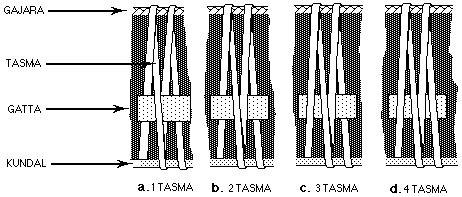
The tightening of the drum is an important procedure. Sometimes this is a trivial procedure and sometimes it is a major undertaking. First check how many straps are passing over the gatta. If there are one, two, or three tasma over the gatta, then tightening is a simple procedure. However, if there are four straps then it is a major job. Let us first deal with the simple process.
The simple job can be done in just a few minutes. One simply has to pull another strap over the gatta. Depending upon the situation, one may have to first remove the gatta and then reinsert it with the extra tasma. Look at the diagram in figure 6 to see the proper order. If there is only one tasma (figure 6a) then bring the second one up as shown in Figure 6b. If there are two tasma then bring it up so that it is shown in figure 6c. If there are three tasma then bring it up so that it resembles the diagram on figure 6d. The process indicated in figure 6 is not haphazard. It can be seen that this order is determined to minimize the torque applied to the gajara.
The tightening of the banya is very similar to the danya. One simply has to insert the gatta and bring them up in the manner shown for the danya (figure 6).
| This book is available around the world |
|---|
Check your local Amazon. More Info.
|
Retightening
Manipulating the gatta is certainly the easiest way to change the tension. However, there comes a time when this no longer works. We must then retighten the drum. This is a major job and previous experience is very helpful, so one may not be able to do a good clean job the first time.
Retightening the tabla is very much like tightening ones shoes. One starts at the beginning of the lacing (figure 7) and moves along the entire length taking up the slack. This involves a considerable amount of physical effort and should not be undertaken unless one is willing to do some real work. Both banya and danya are tightened the same with one exception. The banya puddi must be moistened while the danya puddi must remain dry. Be very careful that the syahi remains dry. When moistening the banya puddi it is good to maintain a 3/4 inch safety margin.
There are four points about retightening to remember. 1) The start of the tasma and the end of the tasma are particularly critical (figure 7); one has to pay special attention to be certain that these two places are tight. 2) Be attentive to the thickness of the tasma; try not to break it. 3) Be attentive to the puddi and try to keep it straight. 4) Pay attention to the kundal and keep it straight too.
Head Change
One of the most drastic repair jobs is the head change. Any problem of the puddi can be fixed with this procedure. Yet it does require experience to do a good job.
Selection of the replacement puddi is perhaps the most critical section of this entire process. There are numerous points to be considered if the fit is to be good and the sound is to come clear. Here are some suggestions.
Skin – The skin should be smooth and even. This may be checked by holding the puddi up to the light to check for inconsistencies. If the skin has fragments of flesh dangling from it then the skin was improperly cleaned. Look to see if there are any scars for this will create problems.
Bharti – Be certain that the puddi has bharti (inner annular lining). A lack of bharti indicates shoddy workmanship and such a puddi should not even be considered.
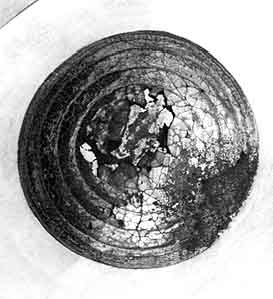
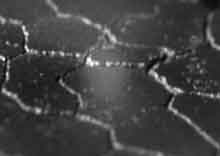
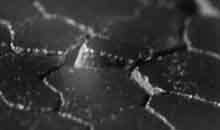
Syahi – The syahi should be rather thick with a reasonable contour (i.e., thicker in the center and thinner towards the edges). It should also have a slight shine to it. It is especially important that it have a tight grain of cracks (figure 8).
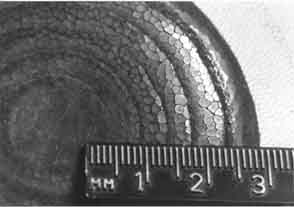
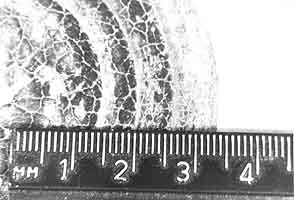
These cracks are so important that it is appropriate to say a few words about it. Syahi is made of a hard material whose stiffness would impede the vibrations of the skin were in not for a simple mechanism. The cracks represent particles which are joined only to the skin below and merely articulate with each other. This is how the syahi is able to be flexible even though it is composed of inflexible material. The density of the cracks represents the degree of flexibility. A high density is very desirable because it indicates a high flexibility. A low density is bad because it indicates a low flexibility. Figure 8a and 8b show typical examples.
Gajara – The gajara is very important in determining the quality of the puddi (figure 9a and 9b). Here are several things to look for.
The main consideration is the number of penetrations. If one looks closely at the gajara one will see that it weaves the bharti, maidan and chat all together. In order for this to happen there must be holes to allow the lacing to penetrate. It is this number of penetration which effect how evenly the tension is going to be distributed. If the head is 5′ or less, 32 penetrations is usual, otherwise the danya uses 48 penetrations. For a banya, 64 penetrations are the optimum. A lower number is an indication of shoddy workmanship.
There is an easy way to tell the number of penetrations without counting every slit in the head. Simply count the number of slits per insertion of tasma. Tabla always has 16 tasma insertions; therefore, a 2-1 ratio corresponds to 32; 3-1 corresponds to 48; and 4-1 corresponds to 64. The illustrations in figure 9b show a 2-1 relationship for the bad danya and 3-1 for the good danya (figure 9a).
The bunad is sometimes an indicator for quality. Bunad is a light goatskin which is cross woven into the heavier buffalo hide. Many areas of India do not use bunad, therefore the presence or absence is not necessarily significant. However if a puddi without bunad comes from a shop or locale which normally uses them, then it is a hint that the puddi was rushed and may not be of the highest calibre.
Proper Size – The size is probably the most importance consideration in selecting the puddi. The banya has a broad tolerance; typically 1/2 inch. In a pinch one can oversize the puddi even more without effecting the sound. However the danya has a tolerance of only 1/4 inch at most. There must also be some room to work. It is easy to forget that the addition of the tasma takes up considerable space. A good rule of thumb is that if you place the danya puddi on the shell you should be able to feel the wooden lip from the top side (chat) without any effort. Additionally one should be able to slip the little finger in between the bharti and the shell yet still feel a snug fit. This usually gives the proper amount of latitude in which to work.
It is often necessary to buy a puddi by mail. Unfortunately the requirements for a correct fit are so stringent that actually placing the head on the shell is the best way to select the proper replacement. Therefore, if you must deal by mail it is best if you disassemble the tabla and send the shell. The appropriate puddi may then be selected and the shell and puddi can be returned to you for further work. Unfortunately this is going to be impractical many times. The next best thing is a very precise measurement. Be certain to measure the diameter of the lip and not the diameter of the entire puddi. In principle, this should always work. In practice, eccentricities of both the shell and puddi, coupled with mismarkings on the puddi mean that you can expect about 50/50 chance of getting things right. Therefore, it is not unusual to order a head, check the size; return it for another size and try again. Because of this inherent difficulty most places in this country will allow you to return a puddi if you have not tried to put it on. But if there are indications that you moistened the puddi and attempted to lace it, nobody will accept a return.
These previously mentioned points are important but by no means a guarantee for good sound. There are many times that a puddi will appear to be good from the previous criteria, yet may give a disappointing sound. Conversely it is possible that a tabla will be weak in several areas yet produce a decent tone. We are not dealing with a mass-produced commodity, but with individual hand crafted items. Furthermore, these items are made of natural materials and thus subject to tremendous variation. Therefore, there is no set of criteria which will guarantee a good quality puddi; however, the previous points greatly increase ones chances.
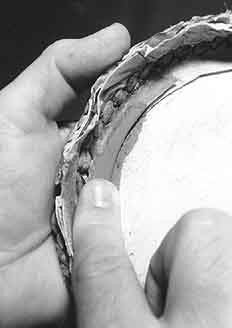
It is obvious that a new puddi cannot be mounted until the old one has been removed. This removal requires a certain degree of physical effort, but is otherwise quite simple. One first removes the gatta and then unties the tasma at the place where it ends (figure 7). Then one simply unlaces it.
The puddi must then be prepared. Take your finger and carefully moisten the bharti and part of the maidan with water. This is shown for the danya in figure 10. The moistening is especially important for the banya puddi because when it dries it will shrink and provide the necessary tension. This moistening must be done with the greatest of care because even a slight amount of water under the syahi will permanently damage the puddi. One should leave at least 3/4 of an inch between the area where water is applied and the area where the syahi starts. We may now start relacing.
We begin the relacing by tying the shell, puddi, and kundal together with a rope. Attach the new tasma to the kundal. The relacing must proceed around the drum so that the tasma passes overt the gajara; under, and then over the kundal. This is shown in figure 11. One should keep in mind that the tasma should not be pulled tight at this time. Wait until the lacing is finished then go back and gently take up the slack.
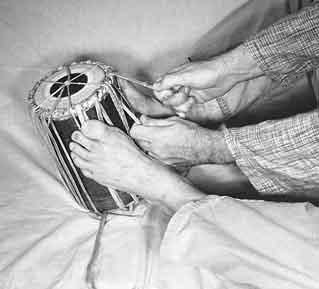
When the slack is taken up, remove the rope and continue tightening. This should continue slowly and evenly with the same considerations which were mentioned in the section dealing with retightening. (e.g., keep the puddi straight, etc.). This requires a considerable amount of strength and it is helpful if we brace the tabla with our feet (figure 12). This allows both hands to do the strenuous job of tightening.
We must now tune the drum. This procedure was amply described earlier. However, we have an additional breaking-in step which is part of the tuning.
The “breaking in” requires a finely polished stone. One should rub the surface of the puddi with the stone. Initially the pressure is light but as we rotate the drum the pressure should increase. This breaking in works by to methods. First, it allows the rawhide to settle into the shell. Finally it acts upon the syahi. Humidity and disuse can cause the particles of the syahi to bind together. The polishing action of the stone separates the particles so that they no longer bind, thus restoring the syahi to its original flexibility.
There remains one finishing touch; cleaning the drumhead. In the course of replacing the puddi it sometimes gets dark and dirty. Although this in no way effects the sound it is good business to give an attractive product to the client. One merely has to use a fine grade sandpaper (approximately #220) and sand the chat and maidan. Optionally, one may work some chalk into the hide during this process.
One optional step is the insertion of string into the puddi. After the head is all finished some repairmen use a coin to insert string, such as kite string, between the maidan and the chat. This slightly raises the chat and reduces the dampening action on the upper partials. This increases the sustain. However it is purely a matter of personal taste because many artists do not like the “bite” that it gives to the sound.
Common Problems and their Repair
We have covered extensively the basic techniques of tabla repair. The basic procedures of tuning, tightening, and head replacement are the most common tasks which need to be performed. We will now discuss specific problems and their recommended repairs.
Major Damage to Syahi – Figure 13 shows a tabla which has major damage to the syahi. The recommended procedure is to replace the entire puddi. In India one would simply replace the syahi; however, this is a very labor intensive operation and is not practical in the West.
Minor Damage to Syahi – Minor damage to the syahi is indicated by an annoying “buzz” or missing particles. Missing particles may be esthetically unpleasant but in no way effect the sound. A loose particle on the other hand adversely effects the sound. It is often possible to fix loose particle without resorting to major work. Unfortunately one must first find it.
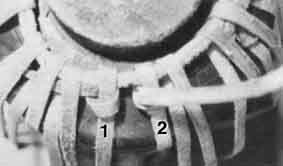
One way to locate the particle is to hold the drum upside down under a strong light then strike it. If the drum is struck in this position it is often possible to see the loose particle with the naked eye. See figure 14a and 14b. This is a very good approach when it works because you can see exactly where the loose particle is. Unfortunately it doesn’t always work.
There is another way which always works but does not allow one to isolate a single particle. Lightly strike the drum with a “Tin” stroke. Now slightly rotate the drum. Repeat the process. If one moves around the rim in this manner it will be seen that in one rotation there will be heavy buzz, light buzz, heavy buzz, light buzz. Now pay very close attention to the last two fingers during this process. These two points of the light buzz described a line which bisects the tabla. The loose particle will be somewhere on this line. In practice both of these techniques may be used together to isolate the particle.
When the loose particle is found one simply has to place a tiny drop of white glue or super glue to bind it to an adjacent particle. The buzz usually disappears.
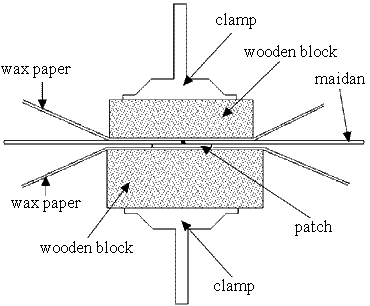
Split Head – A split head has many causes. Physical impact, exposure to high ambient temperatures, and defective workmanship are only a few common reasons. When this happens to the danya the only solution is to replace the head. If it happens to the banya and the hole is small, there is another option. First remove the puddi. Take a small piece of goatskin (perhaps some excess cut from the bharti) and soak it for a few minutes in water to soften. Glue it firmly to the inner surface with a ordinary white glue (the flexible “Elmer’s” white works very nicely). Clamp it firmly and allow it to dry for 24 hours as shown in figure 15. Remove the clamp and allow to dry for a few more hours. The head may then be replaced. If this approach is used, remember to keep the patch dry and not to moisten it during replacement. This technique is certainly inferior to complete head replacement, but works when a replacement puddi is unavailable.
Broken Tasma – This problem is most likely to occur in tablas which have weak tasma to begin with. There are several approaches.
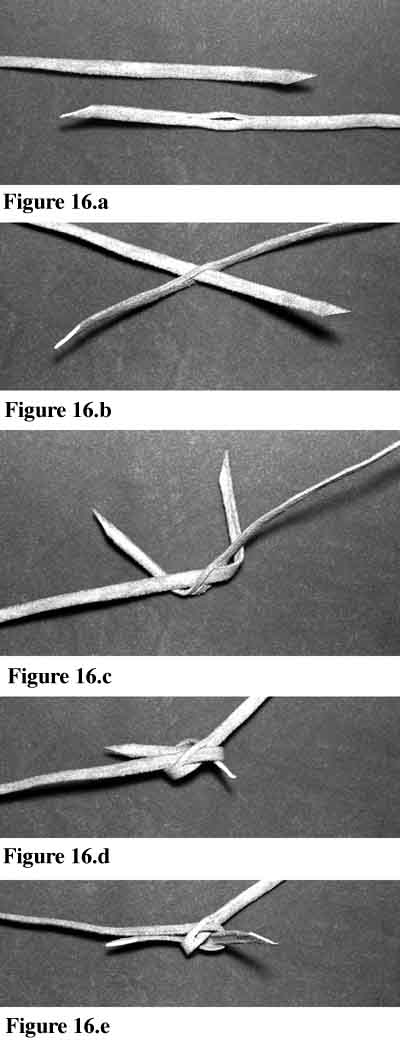
The easiest way is to simply patch the tasma. One first removes the gatta. The excess tasma at the end is the moved towards the broken area. A cut in one side is made. The other end of the tasma is then inserted into the slit and tied in a manner shown in (figure 16a – 16e). The entire tasma is then tightened in the fashion illustrated earlier..
There is a much better way which works only if we have a lot of tasma. First secure the broken side at the kundal. Move excess tasma towards the broken side and secure at the kundal. Treat this as a secondary starting position. The whole thing is then tightened in the fashion described earlier.
Broken Kundal – This is a problem that is due to shoddy workmanship. There is no way that any tabla should suffer a broken kundal under normal use. Unfortunately, I have seen this problem too many times. In every case it was a poorly made tabla from either Bengal (India) or Bangladesh. This entire region is known for the poor quality of rawhide in the tablas.
There is only one course of action for a broken kundal. The entire tabla must be unlaced, a new kundal must be fashioned, and the tabla relaced. If one has to do this I would recommend making a small reference mark on the puddi and drum so that the head is reassembled in the same position. There are fewer problems if the head goes back in the original position.
Dented Banya – This is a very common problem. The easiest thing to do is absolutely nothing. A dented banya may be esthetically undesirable, but it rarely effects the sound quality. Sooner or later the banya will be due for a head replacement, and the shell may be fixed then. When the shell is separated one simply has to beat from the inside with a rubber mallet. If a rubber mallet is unavailable, then a hammer covered in numerous layers of thick cloth works nicely. In almost every case the shell bends back to its original position.
Conclusion
We have covered all of the common problems and their repairs. With these techniques there is no reason for any tabla to be left abandoned, unrepaired or otherwise unused. With more experienced repair personnel it may even be possible for tabla to further increase in popularity. It will certainly be more convenient for the present tabla players.
Glossary
banya – The left hand drum of a tabla pair
bharti – An inner annular lining of the drumhead
bija – A good quality wood found in northern India
bunad – A light gauge crossweave of the drumhead
chat – The outer annular membrane
danya – The right hand drum of the tabla pair.
deel – A very low quality wood
gajara – The weave of the drumhead
gatta – Wooden dowels place between the lacing and the shell
kundal – A ring on the lower part of the tabla which holds the tabla together
lakadi – The wooden shell of the danya
maidan – The main resonating membrane of the drumhead
na – A rim stroke of the danya
pital – The metal shell of the banya
puddi – The drumhead
shisham – An Indian rosewood
syahi – The black spot on the tabla
tasma – The rawhide lacing
tin – A stroke of the danya
Works Cited
Courtney, David
1980 “An Introduction to Tabla”, Anand Power Press, Hyderabad.
1985 “Tabla Making in the Deccan“, Percussive Notes, Percussive Arts Society, Urbana Ill: Vol. 23, No 2, January 1985: pp. 33-34.
1988 “The Tabla Puddi”, Experimental Musical Instruments: Nicasio, CA: Vol. 4, No 4, December 1988: pp. 12-16.
1991 “Tuning the Tabla: A Psychoacoustic Perspective“, Percussive Notes, Percussive Arts Society, Urbana Ill: Vol. 29, No 3, February 1991:pp. 59-61.
Sharma, Bhagavatsharan
1973 Tal Prakash, Sangit Karyalay, Hatharas, India.