| This article is only an intoduction. If you would like more information please check out “Manufacture and Repair of Tabla” |
This article previously appeared in the December 1988 issue of Experimental Musical Instruments, Nicasio Ca:EMI pg.12-16
Introduction
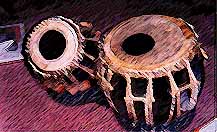
Tabla has intrigued Western percussionists for a number of years. This drum of Indian origin, is noted for its unique tonal quality. This quality is derived primarily from the complexity in construction of its drumhead. The drumhead, known as pudi, puddi or purri, is indeed so complex that it would be safe to say that no other drumhead on earth surpasses it in this regard, though others may occasionally equal it.
The word tabla is commonly applied to both drums as a pair. This is not correct by the strict definition of the word, because actually only the smaller right hand drum is the tabla. The larger left-hand drum is called variously dagga, bayan, or madda. Other names for the smaller tabla are siddha, or dayan. For convenience sake we will use the term tabla for both drums while the left and right hand will be called bayan and dayan respectively.
The fashioning of the pudi (drumhead) is a highly specialized craft. This craft is passed down from father to son in a manner typical of India tradition. A craftsman is known as a tablawala, and is usually distinct from the performer (tabaljii or tabalia). The apprenticeship usually starts in childhood and is completed only when the craftsman reaches full maturity. A close look at the construction will reveal why it takes so long to learn the craft.
| This book is available around the world |
|---|
Check your local Amazon. More Info.
|
Basic Structure
It is helpful to have a rough idea of the anatomy of a tabla pudi before tackling the subject of its fabrication. Figure 1 shows an expanded cross section (minus the woven hoop called the gajara). There are basically three parts of the pudi. 1) the weaving (gajara) 2) the membranes 3) the syahi (black spot).
Figure 1. Exploded view of tabla
The weaving (gajara) is composed of several components. The gajara is the most important as well as the most visible. It is a heavy ring of woven leather and rawhide, composed of thong made of thick buffalo hide, which is woven into the pudi around its periphery. It functions as a tensioning hoop, fitting over the top of the body of the drum and transferring tension from the lacing to the sounding skin. The bharti is an invisible layer of skin on the inside surface of the pudi. This is important for giving mechanical strength to the pudi.
The resonation membrane is basically two components, the maidan and the chat. The chat is an upper annular layer of skin which covers only the outer periphery of the sounding surface. It serves a dual purpose. On one hand it gives mechanical strength to the weaving, but on another level, it is an important part of the resonating membrane. The chat is important because it has great effect upon the tonal quality of the tabla.
The maidan has the distinction of being the only skin which covers the entire opening. This is therefore the most important part of the pudi.
The syahi (the black spot in the center of the pudi) is probably the most distinctive part of the tabla. It is there to give the tabla its distinctive tone. It is actually quite complex and a considerable amount of discussion will be devoted to it later.
Construction
Making the pudi for both drums is about the same. It begins by taking the rawhide of a goat and soaking it in water. Once the rawhide is wet, excess hair and tissue is removed and the whole is allowed to dry.
Templates, known as jal are used to mark off circles of various sizes for use on various drums. Great care is taken so that the small scars the goat acquired from ticks and other sources are avoided. The area of the neck and spine is avoided in the case of the dayan, but it is considered acceptable for the bayan.
The circles are then cut and the unused sections (chiller) are cut into trapezoids of varying sizes. These trapezoids will be used later.
The circular pieces of skin are now graded as to quality. The lowest grade will have the centers removed and be used for making the outer covering of the pudi (the chat). The medium grade is used for low cost, student grade tablas, while the highest grade is used for professional quality pudis.
The skins are again soaked in water and removed.
The chat must now be made. The lower quality skins are utilized by folding them in half several times to form a triangle. The tip is cut off, so that when it is unfolded, there will be a circle of about two to three inches in diameter that has been removed. This is very much like the paper “snowflakes” we used to make in elementary school.
The chat now has to be fixed to the main playing skin (maidan). The chat is laid on top of an intact skin so that the outer surfaces of both skins face up. Insertions are made parallel to the edge of the skins with a small chisel. Care should be taken so that the chat is slightly bunched up, so that on the drum all of the tension will be exerted against the maidan (figure 2). A piece of cord is inserted with a large needle and threaded back and forth through the two skins as the insertions are made. Finally the two ends of the cord are tied together.
Figure 2. Chat and Maidan
The chat serves several very interesting functions. One of the jobs is to give strength and durability to the pudi. The main resonating membrane undergoes a tremendous amount of abuse where it passes over the sharp edge of the drumshell. This extra layer of skin increases the life span of the head. Under normal use a pudi may last anywhere from 2 to 10 years. The chat also effects the tone of the instrument. If the chat is very broad and extends inwards to a great extent, it will decrease the sustain of the instrument.
The effects of the chat upon the tone may be illustrated in several ways. The most obvious is the manner in which the craftsman trims the chat to give the right tone upon completion of the tabla. Another is a trick used by many musicians to enhance the tone of their instruments; a string is place around the drum between the chat and the maidan. This may have an effect which is sometimes subtle and sometimes great. There is another trick which is used to make the tabla sound like a mridangam (a south Indian barrel shaped drum). For this, small wooden pieces are inserted between the chat and the maidan such that the wood extends until it just touches the syahi. These are all tricks which utilize the acoustic interactions between the chat and the maidan, thus demonstrating the effect of the chat upon the tone of the tabla.
The bharti will now be made. The previously mentioned trapezoids are soaked in water, and laid around the rim of the drumshell. The shorter edges face inside (figure 3a).
Figure 3. Intermediate stage
The chat and maidan, joined previously, are now stretched over the bharti and drumshell and tied securely (figure 3b).
There is no real attachment between the pieces of bharti, maidan, and chat at the present stage of construction. The attachment will come with the weaving of the gajara.
The weaving of there gajara begins by making vertical slits around the edge of the tabla (figure. 4). The bayan requires 64 slits while the dayan requires only 48. Care must be taken that all layers of the skin have been penetrated.
Figure 4. Making the insertion slits
Two long pieces of buffalo hide are used for the weaving. Each thong (tasma) is first soaked in water, then lightly covered with oil. The two thongs are inserted into three adjacent holes up to their midpoints (figure 5a), thereby making four loose ends.
There must be a central core around which the gajara is woven. This is made by taking two or three lengths of inferior quality leather thong and wrapping them around the rim. The gajara is started in the following manner:
- Insert two lengths of thong into three adjacent holes (figure 5a).
- Twist in clockwise manner.
- Go over two slits and insert (figure 5b).
- Pull out third slit.
- Go to next thong.
- Repeat steps b, c, and d (figure 5c).
- Go to next thong in same slit.
- repeat step b (twist).
- Go over three slips and insert.
- Pull out from bottom of the fourth slit (figure 5d).
- Go to next thong.
- Repeat steps h, i, & j, but keep loose (figure 5e).
- go to next thong.
- Repeat steps h, i, & j, but keep loose (figure 5f).
- Go to next tasma.
- Repeat steps h, i, & j, but keep loose (figure 5g).
- Insert core thong (figure 5g).
- Tighten first two thongs.
- Take next thong.
- Repeat steps h, i, & j, but keep loose (figure 5h).
- Insert last core thong.
- Tighten last thong.

The gajara is now started. Continue weaving in the following manner (figure 6a).
- Take thong from bottom.
- Twist 1/2 turn in clockwise fashion.
- Go over two slits and insert in the third slit on top of the core thong.
- Pull out of the bottom of the fourth slit.
- Go to next thong and repeat.
Eventually the weaving must be finished. The weaving will end in the following fashion:
- Stop weaving when thong exits at the starting point (figure 7a & 7b).
- Cut outer core thong so that it extends 1 1/2 inches over the starting point
- Cut inner core thong so that it just touches starting point.
- Cut middle core thong so that it extends
1/2 to 1 inch beyond the starting point. - Twist thong 1/2 turn in clockwise direction.
- Pull thong over four spaces and insert between chat and gajara.
- Pull Tight (figure 7c).
- Go to next thong and repeat steps 5, 6, 7, and 8, for the next seven times (figure 7d, 7e, & 7f).
- Trim off excess thong.

The gajara is nearly complete at this point. The only remaining step is to weave the bunad. Many craftsmen eliminate the bunad entirely. The weaving of the bunad goes as follows (figure 6b):
- Pull a strip of dry goathide, rexine or similar material between the gajara and the chat (pull up).
- Skip closest thong and pull bunad through under the next one.
- Pull into correct position.
- Skip next thong and pull bunad through under next one.
- Pull down to proper position.
- Pull tight.
- Put another piece of bunad through the next hole.
- Repeat steps b, c, d, e, & f.
- Go back and pull the first bunad through the next hole.
- Repeat steps b, c, d, e, & f.
This alternating back and forth proceeds until all of the gajara is done. Upon completion of the bunad, the gajara is finished.
As mentioned earlier, the gajara the function of transferring the tension from the lacing to the maidan. However it does so in a manner which is considerably more refined than the hoop found in Western drums. Unlike Western drums the gajara has a buffering effect upon this tension. This buffering is important because very little variation in tension is tolerated by the tabla. This low tolerance is a natural consequence of the requirement for precise tunability. An interesting feature of this buffering effect is that changing the tension on the lacing functions as a “course tuning” while lightly hitting the gajara with a small hammer acts as the “fine tuning”. In practice the majority of the tuning is done without any change in the tension of the lacing at all.
The gajara also performs the necessary but mundane function of joining all three levels of skin (i.e., bharti, maidan, and chat) together.
The pudi is now removed from the shell and the bharti is trimmed. It is trimmed by taking a flat piece of bamboo and slipping it between the maidan and bharti. The bamboo piece is used to shield the maidan from the blade. The bharti is trimmed so that there is an even 1/2 inch projecting into the middle of the pudi.
The function of the bharti appears to be primarily mechanical in nature. The bharti reinforces the maidan and keeps it from tearing under high tension.
The pudi must now be mounted. This mounting process is beyond the scope of this article.
| ARE YOU INTERESTED IN HOW THE TABLA IS MADE? |
|---|
This is the third volume of the most complete series on the tabla. Manufacture and Repair of Tabla |
The Syahi
It is now time to apply the syahi (the black spot).
A base for the syahi must be established. This is done by boiling a small amount of mucilage (called raal, saresh or sharesh) until it becomes soft and gummy. It is then applied to the exposed surface of the maidan to form a circle of approximately 3 1/2 inches for the dayan or 4 to 4 1/2 inches for the bayan. The circle is then allowed to dry in the sun.
Syahi masala is the key ingredient for the creation of the syahi. This is a commercially available powder reputed to be made of soot, iron dust, and other unidentified vegetable matter. It is said that the best syahi masala comes from Bhawnagar in the Western state of Gujarat.
To prepare the paste for syahi, a little vessel is filled with a small quantity of water and white flour. This is heated and mixed to make a glue (lai). The glue is now mixed with the syahi masala. The whole mixing process is done in a rubber mat made from an old inner tube. After a thorough mixing the paste is finished. The application of a layer involves three steps:
Step 1. The syahi paste must be applied. This is done by using the first finger of the right hand to take up a small quantity of paste. The paste is quickly applied with a circular motion of the finger to the area previously covered by the mucilage. Support is given to the first finger by placing the second finger over the first.
Step 2. Excess paste must be removed. This is done by scraping with a curved metallic strip. The tabla is rotated during this process so that the application is of uniform thickness.
Step 3. Polishing with a stone is the final step. Immediately after the excess paste has been removed, a polished piece of basalt is used to rub the syahi repeatedly. The pressure is very important; it starts gently and builds up to a considerable level. Periodically the stone is rubbed against the cheek to deposit a microscopic amount of sweat. The polishing is very important because it will determine the density of cracks which are visible in the syahi. These cracks will be discussed in greater depth later.
Steps 1, 2, & 3 are repeated for more layers. The diameter of each layer remains full size until four or five layers have been applied (figure 1 at top of page). Then the diameters are reduced until the layers are hardly more than half an inch. A few full size layers are again applied, followed by decreasing sizes. This process continues until the desired thickness and shape is attained. This too will be discuss later.
The finished syahi is the most distinctive part of the tabla. It has a greater impact upon the tone than any other part. For a further understanding it is necessary to understand how membranes resonate.
A membrane stretched over a hoop with uniform tension resonates in a most unmusical manner. It is an inharmonic spectrum with no clearly defined fundamental. Across the world there are two approaches to modifying the drum’s tonality. One approach is to further muddle the harmonic structure. The “snare” on a snare drum is a well known example. This has been a common approach for many Western drums for centuries.
A completely opposite philosophy exists in efforts to give the drum a more defined pitch. A classic approach is to attach the membrane to a resonator and use the membrane to excite the resonator. Such an approach is found in the timpani and conga. Of relatively recent origin (in the West) are methods involving the modification of the membrane itself. Stories abound of conga players who take a heavy hide and sand the periphery of the skin so that the finished drumhead is thicker in the middle and thinner at the edge. Another example is the adhesive dots placed at the center of many marching drums. For both cases, the increase in mass in the center serves to make the membrane vibrate in a more harmonic fashion.
This is exactly what the syahi does. It produces a more clearly defined harmonic and therefore a more clearly defined pitch. (Strictly speaking the fundamental is absent in the tabla however this topic is covered in another paper). One of the ramifications is that a change in the tabla can be effected by changing the syahi. Therefore it is quite common to find tablas made of the same thickness skin, on the same size rim, with the same tension yet having very different musical pitches. This is because a thick syahi will naturally resonate at a lower frequency than a thin one.
There is one caveat which must be kept in mind. The shape of the syahi is very important. The syahi will always be thicker in the center than at the edge, but by how much? If the geometry is not correct then many of the resonance modes will not converge in a proper way. The sound will be dissonant with different strokes evoking different pitches. This is unacceptable to Indian music which require a clearly defined tonal base.
There is one more point to keep in mind. We applied the syahi in numerous thin layers. However it no longer behaves in this manner. The key to this lies in the network of cracks which permeate the syahi.
It is clear at a glance that the syahi covers a considerable area of skin. It is also obvious that the ingredients of the syahi harden to the consistency of cement. Such a hard material covering a substantial area of the skin should hamper the vibration. The cracks are the key to the syahi having flexibility, even though it is composed of such a rigid material. What appears to be a monolithic application is in reality a matrix of unconnected particles, bound firmly to the skin but unconnected to each other. Because they are unconnected the syahi exhibits a surprising degree of flexibility.
The next step of construction is to trim the chat. It will be trimmed to a width of approximately 1/2 to 3/4 of an inch in width. The maidan is protected from the blade by the bamboo piece in the same way that was done for trimming the bharti.
The final phase of construction is purely cosmetic. Any excess syahi can be scraped away with a blade. The outer surface of the skin is then lightly sanded with sandpaper. Lastly, chalk is applied to the chat and maidan and again lightly sanded. This chalk is the reason that new pudis look so nice and clean but quickly turn brown after use.
The pudi is now finished.
Conclusion
We have endeavored to do two things with this article. We have tried to give the minimum amount of information necessary to allow one to make a tabla pudi. Needless to say the first few attempts will produce crude pudis, but with some practice, you can gain a considerable degree of proficiency. Secondly, we have attempted to briefly describe the function of a few of the parts of the pudi. A considerable amount of work would be necessary to describe the physics in great detail. This shall be left for another article.
Anyway one looks at it, the tabla pudi is an interesting object of contemplation.
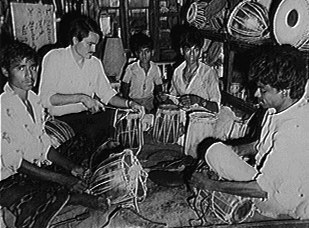
Figure 8. David constructing tablas
Glossary
Included here are the Indian terms which recur in this article.
Bayan: The larger metallic drum.
Bharti: A layer of goatskin, made up of small overlapping trapezoidal pieces (Maidan) for added strength.
Bunad: A goatskin thong which is woven into the gajara.
Chat: An annular skin which lies over the main sounding membrane (maidan).
Dayan: The smaller wooden drum.
Gajara: The woven hoop of the pudi.
Maidan: The main membrane.
Pudi: The drumhead.
Tabla: In common terms both of the drums together; more precisely the smaller wooden drum.
Tasma: Thongs of leather or rawhide.