(Plans and Instructions)

Here are plans and instructions on how to make a gopichand (a.k.a. gopiyantra, ektora, ektara). It is a very nice weekend project that does not require a lot of experience in woodworking. Furthermore, the wide latitude in materials that can be used means that getting the materials is easy even outside of India. All things considered, it is a nice project for teenagers and adults alike.
| THESE BOOKS MAY NOT BE FOR YOU |
|---|
A superficial exposure to music is acceptable to most people; but there is an elite for whom this is not enough. If you have attained certain social and intellectual level, Elementary North Indian Vocal (Vol 1-2) may be for you. This has compositions, theory, history, and other topics. All exercises and compositions have audio material which may be streamed over the internet for free. It is available in a variety of formats to accommodate every budget. Are you really ready to step up to the next level? Check your local Amazon. |
Tools and Materials
It is always a good idea to gather all of our tools and materials together first. Here is what we will need.
Tools
- Electric drill
- Wood rasp
- Box cutter or razor blade
- Saw (preferably electric)
- Large iron nail or similar iron rod
- Stove or gas torch (to heat the iron rod)
- Sandpaper of various grades
- Fine tipped marking pen
- Small spoon
Materials
- Bamboo (1-2 inches in diameter and 24-30 inches long)
- Large coconut (4-8 inches in diameter)
- Block of solid wood (3/8 – 1/2 inch in thickness, 1/2 – 1 inch in width, and 4-6 inches in length)
- Goat skin or calf skin (untanned, you can get calf-skin drumheads at most music stores)
- Steel guitar string (the high E or the thinnest one in the pack of strings)
- Thumbtacks
- Wood glue (Elmer’s wood glue works well)
- A button (approx 1/2 inch in diameter)
- Wood paint (any colour) or varnish
- 2 small wood screws
Make the Resonator
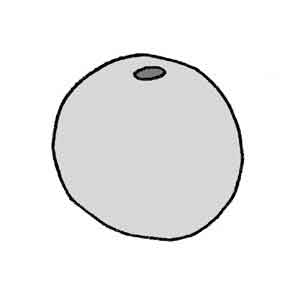
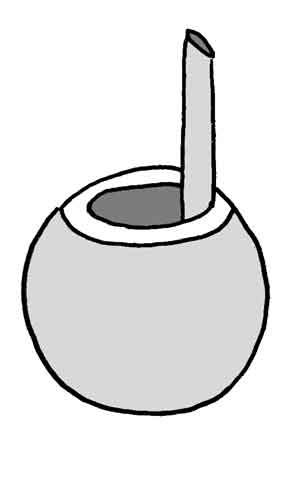
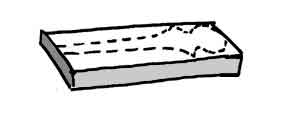
The resonator is the first thing that we need to make. Let us start by taking the large coconut and drilling a hole in the top. The hole should be large enough to allow you to pour out the coconut milk. This is shown in the illustration below:
With the wood rasp or a course sandpaper remove any fibre that may be adhering to the coconut.
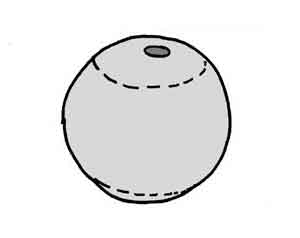
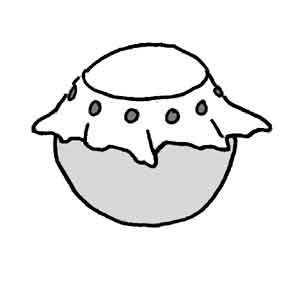
Take the marking pen and draw two circles. One will be at the top of the coconut and one will be at the bottom. These circles should be 3-5 inches in diameter. Make the upper circle smaller than the bottom one. The exact size is dependent upon the size of the coconut. Please note that larger circles will create an instrument that is deeper and louder while smaller circles will produce an instrument with a sharper sound. This is shown in the illustration below:
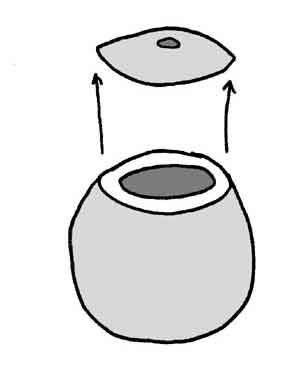
Take a saw and cut off the top circle. Remove the top and discard this piece. This is shown in the illustration below:
With a spoon, dig out the white flesh of the coconut. Either eat this or discard it.
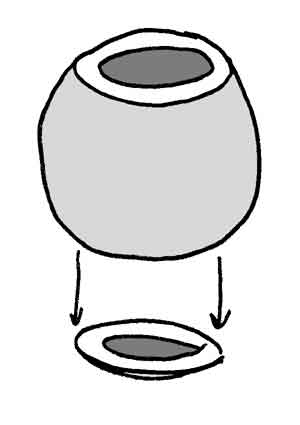
Cut off the bottom circle and discard this piece. This is shown in the illustration below:
Take the calf skin or goat skin and place this in a container of tap water. Let this soak because we will need it later
Take a wood rasp and clean up the opening on both ends. The top opening is not important, but the bottom opening should be beveled inward so that it presents a fairly sharp edge. This is shown in the illustration below:
See that the calf skin is thoroughly soaked. Usually 20-30 minutes is sufficient. Apply a small amount of glue about one inch around the bottom opening (the one with the bevel) then tack the skin around this bottom opening. Please note that it will be mainly the glue and not the tacks that are holding the skin in place. Please also note that coconut shell has a tendency to crack. Therefore, you may wish to pre-drill the holes that the tacks will be placed in. Put the whole thing aside and let it dry thoroughly (I recommend 12-24 hours to allow the glue to set and the skin to dry). The whole thing is shown below:
Make the Neck
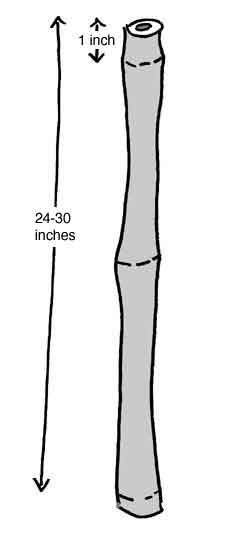
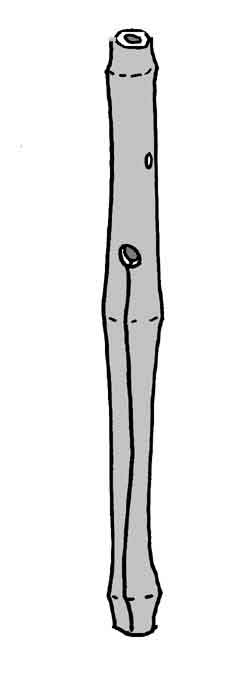
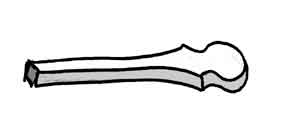
Take the length of bamboo. It should be cut from about 1 inch from one of the nodes. It should be 24-30 inches in length. This is shown in the illustration below:
We will next have to burn holes in the bamboo. It is important that these are burned and not drilled. If one tries to drill bamboo, there is a likelihood that the bamboo will split. Even if the holes are successfully drilled, they will probably split later. Holes that are burned are much more durable.
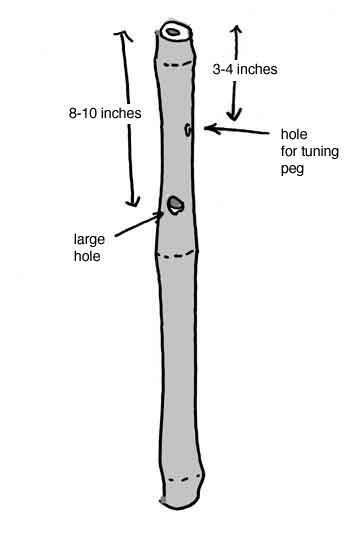
Let us first burn the two holes for the tuning pegs. These holes should be about 3 inches from the end. This should just give a reasonable clearance from the node at the end of the bamboo. Keep the tuning peg holes small for now, probably no larger than 1/4th inch. We will be able to enlarge them later.
Let us now burn the two larger holes; their function may not be clear now but it will become clear as we go along. The two large holes have a size which is dependent upon the diameter of the bamboo. A good rule of thumb is to burn these holes so that their diameter is half of the diameter of the bamboo.
These holes are shown in the illustration below:
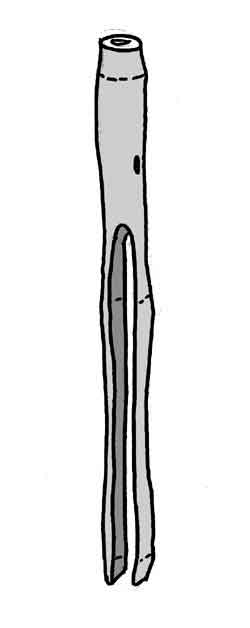
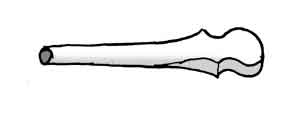
Take the saw and cut a slit (on both sides) of the bamboo all the way up to the large hole. This is shown in the illustration below:
Take the wood rasp and gently remove excess material from the inner part of the slit. One should finally end up with a bamboo tube with two long tongs protruding as shown in the illustration below:
Make the Tuning Peg
The tuning peg must now be fashioned. Take the solid block of wood. (It should have the dimensions indicated in the materials section.) Mark it with the marking pen. Mark it with a pattern similar to the one shown below:
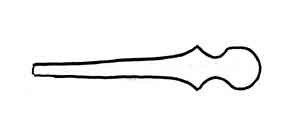
The block and the markings should now look like this:
Now we take either a wood rasp or small saw and remove the excess wood until it looks like this:
We must now carefully round the long end of the tuning peg. It is important that this long end not be cylindrical, but have the form of a highly elongated, yet truncated cone. This may be fashioned using either a fine toothed rasp or course sandpaper. The peg should now look like this:
Final Assembly
Now is the time to put the various pieces together.
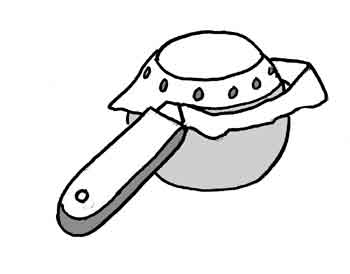
We must now finish the resonator. At this point the glue should have set, and the skin dried and become very tight. Let us take the blade or box knife and trim the excess skin away. This is illustrated below:
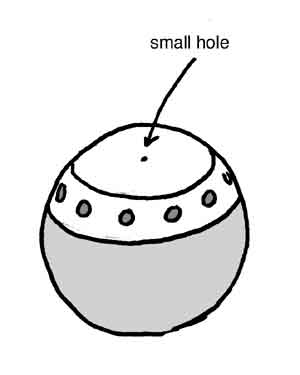
Next we poke or burn a small hole in the centre of the skin. This hole should probably be no bigger than 1mm. It is illustrated below:
Carefully work the inner surface at the ends of the bamboo tongs with the rasp so that you get good contact with the coconut resonator.
Burn a hole in each end of the tongs to accept the wood screws. Then drill two small holes in the coconut to accept the threaded portion of the screw.
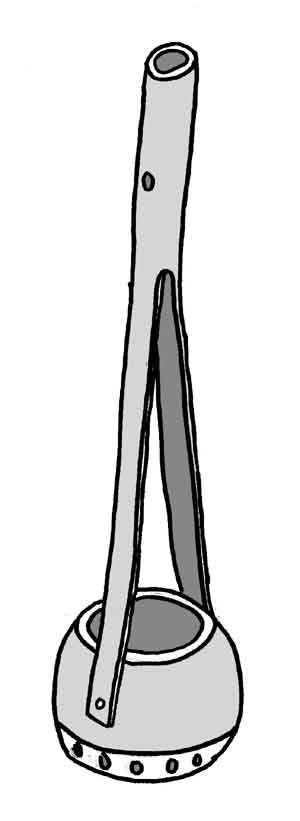
Apply a liberal amount of wood glue on the contact surfaces, then connect the neck to the resonator. Tighten the screws. (Remember that it is the glue which holds the neck to the resonator. The screws are just there as a reinforcement.) This whole assemble is shown below:
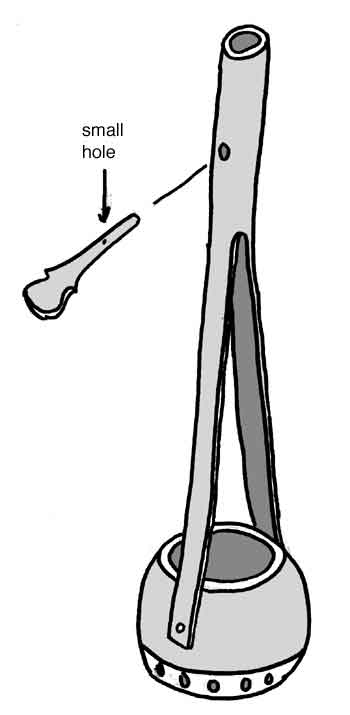
We must now fit the peg to the neck. We have already made holes for the peg but it is considerably smaller than necessary. We must now gently enlarge these holes until they match the peg. This is a process of “cut and try”. It is a question of repeatedly burning the holes out just a little at a time until the peg fits snugly (Remember to remove the excess charcoal from the holes as you work with them.)
Once you are satisfied with the fit of your peg, identify where the string should be attached. remove the peg and drill a small hole for the string. This is shown below:
Painting and Finishing
One may now paint it and finish it according to ones desire. Just remember to leave the exposed portion of the skin unpainted.
Stringing and Tuning the Gopichand
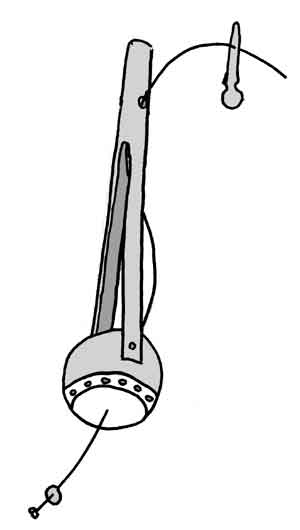
It is now time to string the instrument. Take the thinnest string from a set of guitar strings and run it through a button. Then pass the string through the hole in the centre of the skin. Pass the string out through the top of the resonator and up through the bamboo neck and finally out the hole for the peg. Continue the string into the hole in the peg itself. This is shown in the illustration below:
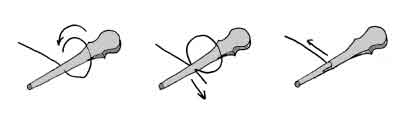
It is now necessary to attach the string to the peg. There is a way which is traditionally used to mount strings in India. It is very effective, yet not intuitive. One first passes the string through the hole in the peg, one comes around and passes through the hole one more time. Next the last inch is bent down. Finally one pulls the string tight. When the peg is tightened it will wrap around the bent piece and hold the string without slipping: This is shown below:
The gopichand must now be tuned. Due to variations in length, it is not possible to say exactly what the instrument should be tuned to. There will be a range of several steps over which the instrument will sound good. If this range does not meet your particular musical requirements, try restringing it with either a lighter or a heavier gauge wire.